Monday, June 10, 2013

Maple Caramel Flan


Crown Royal Maple is truly a love at first sniffle.  It has such a luscious flavor I’ve used it in countless dishes since my first discovery, even Tiramisu!!!
This is one of my most requested recipes, even the owner of the neighborhood liquor shop, the one who sold me the 2nd bottle of Crown Royal Maple, wants some, too!!! 

A Ingredients
Sugar                          1/3 cup
Water                             4 teaspoon
Hot water                       4 teaspoon
Crown Royal Maple      ½ teaspoon(optional)

B Ingredients
Milk                    1 2/3 cup
Sugar                       ½ cup

C Ingredients
Egg                                    5 piece
Egg yolk                            1 piece
Heavy whipping cream    ½ cup

Directions:
1. Preheat oven to 325°F/160°C
2. Prepare 4-6 little oven-safe ceramic cups, spray with cooking spray.  Then place these cups into a big roasting pan.
3. Boil a hot of water, the hot water should come half way to the molds in roasting pan.
4. In a small sauce pan, heat the A 75g sugar and 20 g of cold water until the edge is medium/dark amber color.  Remove from heat and whisk in 4 teaspoon of hot water and ½ tsp of Maple Whisky.


5. Heat B ingredients until almost boiling.  Beat C ingredients in a big bowl until pale yellow.  Add the hot B ingredients into C in a steady stream while beating.  Don’t add too fast or the eggs will scramble.  Next, beat in the heavy whipping cream.  Sift the custard to make sure no scramble eggs.
6. Divide the egg custard evenly into molds.  Pour the hot water into the roasting pan, water should come up to half way of the baking molds.  Bake in the oven for 25-30 minutes
7. Remove the roasting pan from oven and let cool 15-20 minutes before serving.  Run a knife around the edges to release the flan, then invert it onto a small dessert plate.  Can also be served cold after refrigeration.  Keep in flan mold in frig for about a week.

Servings: 6

Thursday, May 23, 2013

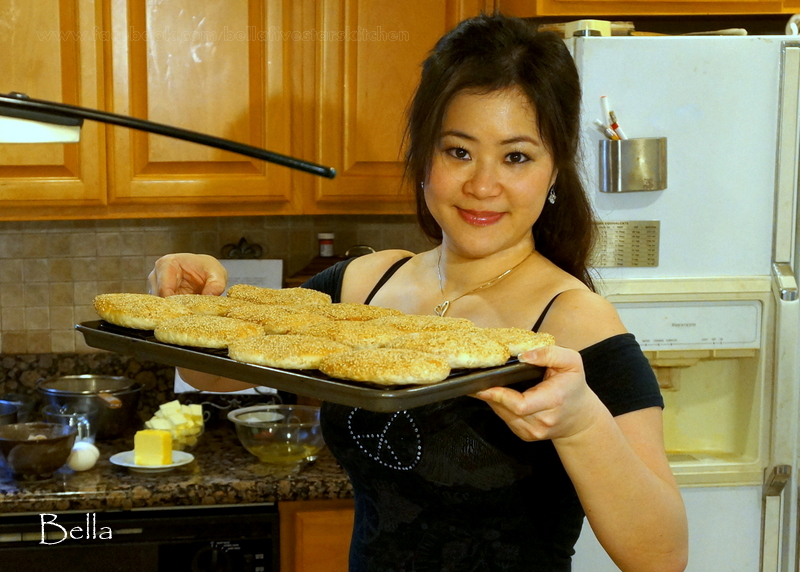
Butter Pastry


 This recipe is one of my all time favorites.  It took me years to perfect.  Hope you like it! 

I. Dough Starter (prepare the night before or at least 8 hours before)
A Ingredients
Dry yeast                           rounded ¼ teaspoon
Warm water ((105-115°F)               40 g

B Ingredients
All purpose flour                              60 g
Salt                                                        pinch

Directions:
1. Mix A ingredients, let rest 5 minutes.
2. Mix A and B ingredients until and knead until smooth, cover and let rest in room temperature around 8-10 hours.  (any longer,  put the dough in the frig, let sit at room temp for 30 minutes before using)

II. Pastry Wrapper
Dough Starter           the above recipe
All purpose flour                  100 g
Powdered sugar                        20 g
Peanut oil                                  40 g
Cold water                            50~55 g
Directions:
1. Mix all the ingredients by hand, or with an electronic mixer until smooth, around 5-8 minutes.  Cover and let rest 20-30 minutes. 

III. Pastry Dough

Ingredients
Cake flour             100 g
Peanut oil                40 g

Directions:
Sift the flour then add the oil, mix until blended.  Divide the dough into 12 equal portions, cover and set aside.

IV. Buttered dough

C Ingredients
Butter                                 50 g
Shortening(or margarine)   50 g
Powdered sugar                  85 g
Salt                                     1/8 g

D Ingredients
Eggs, slightly beaten          10 g
Powdered milk                  100 g

Directions:
1. Blend all C ingredients together.  Beat in the D eggs until blended.
2. Add the powdered milk, mix just until blended in, no loose powder.
3. Divide the dough into 12 equal portions, roll into balls, cover and refrigerate until ready to use.

V Combine
Ingredients
Sesame, white, toasted       1 cup

Directions:
1. Preheat oven to 350°F/180°C.  Divide the bread dough into 12 equal portions, roll into balls, cover and let rest for 20-30 minutes. 
2. Take a bread dough, push an oil dough into the center, pinch at the bottom, roll it to make a round shape. 
3. Seam side down, press down with your hand, roll the dough out into about the size of your hand. Flip over, seam up side, roll up from the short side. 
4. Seam side down, press down with your hand, then roll the dough out into the length of your hand, flip over, seam side up, roll up from the short side. 
5. Seam side up, press down with a finger in the middle of the seam side, then gather the side and pinch towards the center to make a ball.  Flip over, seam side down.
6.  Press down the ball into half the height, using a rolling pin, roll from the outside towards the inside to create a thick in the center, thin on the outside UFO shaped dough, Wrap a butter ball into the center on the seam side, pinch tightly on the bottom to seal.  Put the ball, seam side down on the working surface, using both of your hands to make it as round as possible.  Then press down the ball again into about half the height. 

7. Brush the top with water, then press the wet side down into a bowl filled with white sesame.  Take out and put the dough onto the working surface again, sesame side up.  Roll with a rolling pin into a long oval shape about the size of your palm.  Place the dough onto a parchment lined baking sheet. Repeat with others and put the baking sheet into the oven for 16-18 minutes or until golden brown.  If you like a crispier finish you can bake an additional 2-3 minutes.  Remove to a wire rack to cool completely. Store in air tight containers.

Servings: 1 dozen

Tuesday, April 30, 2013

Almond Florentine


The first time I had this, my godmother Michelle had made it.  It was truly love at first bite.  The preparation and ingredients are so simple, anyone can make it.  Please give this a try.  You’ll all fall in love. 

A Ingredients
Egg whites          50 g
Sugar                   50 g
Butter, melted     20 g
Cake flour           15 g

B Ingredients
Sliced almonds         100 g

Directions:
1. Preheat oven 325°F/160°C.
2. Whisk the A ingredients in a medium bowl until opaque.
3. Gently fold in B ingredients with a rubber spatula.  Careful not to break the sliced almonds.  
4. Line a baking sheet with parchment paper.  Scoop the prepared batter 2 inches apart onto the baking sheet, around 1 -2 tablespoon per cookie
5. Using your fingers to separate the stacked sliced almond.  The objective is to have a single layer of sliced almond across.  So the cookies will be thin and crispy and bakes evenly.  The ideal cookie size should be about the palms of your hand. 
6. Bake in the oven for 10-13 minutes.  Let cool 1-2 minutes before removing the cookies to a wired rack.  Let cool completely before storing in a air tight container. 

Serving: 1 dozen


Sunday, April 14, 2013

Super Sandwiches


            At first, I didn’t know what to name this sandwich.  During a filming break, my photographer/camera man, Albert said “super sandwich.” Hey! It’s perfect!!  After packaging, this sandwich is perfect for picnic or a family trip.  I’ve packaged a bunch of them to a beach party once!!  My friends had never seen sandwiches packaged this way, but they all love the taste!!! 

           The day of filming was one disaster after another.  I woke up in the morning with a raspy voice and stuffy nose.  What woke me was my neighbor’s construction project! It was also unfortunately street sweeping day.  On top of that, my parents had a very exciting political discussion in the backyard, which was caught on tape.  Seriously?  Wait wait wait, it’s not over yet.  That night after filming, I broke in a fever of 102.  Record!!

A Ingredients
Toasts                 8 slices
Ham                   4 slices

B Ingredients
Hard boiled egg, chopped       2 heads
Mayonnaise                              2 tablespoon
Ground black pepper               to taste

C Ingredients
Cucumber, shredded      ¼ cup
Mayonnaise                      1 tablespoon
Apple cider vinegar         1/8 teaspoon
Sugar                               1/8 teaspoon

Directions:
1. Stir all B ingredients together into an egg salad.

2. Stir all C ingredients together into a cucumber salad.

3. Place toasts, four slices into a stack, spread the egg salad, ham, and cucumber salad into each of the three layers.
4. Slice the edges off the four sides and cut diagonal into two triangles down the middle.  Bag the sandwiches into triangle bags for easy to go. 

Servings: 2-4 Servings


Sunday, March 31, 2013

Lucky Cat Birthday Cake


 The first time I celebrated Nana’s birthday was her 80th. Nana, Jason, and I drove down memory lane to her old house in Redondo Beach at the beautiful California coast.  I finally got to see the house Nana mentioned fondly so many times before - the white beautiful beach house with a big bay window looking out to sea.  As we drove near the coast, the fog rolled in.  I saw the beach house standing there in front me, quietly telling me a story of time.  Nana was telling stories after stories in tears.   We all sat there quietly listening in front of the house.  

We followed Nana’s memory lane to The Village.  It is a little gourmet shopping mall right by the ocean where Nana used to walk with a basket to buy groceries.  We stopped there and walked store by store with Nana.  She was elated being able to visit old friends.  Nana greeted everyone.  It took hours to finish touring The Village.  It is time for dinner.
We had reservations at the Cheesecake Factory right by the marina.  We had a wonderful time and a fantastic birthday dinner.  Nana thanked us so many times and told us it was a best birthday gift anyone can ever give.  We were glad.  Our little outing ended with a slice of tuxedo cheesecake and a candle while the staff sang the birthday song.  

After that birthday party, we’ve spent 8 more years.  On March 10 every year, we’d planned nice dinners and a show.  Recent years Nana’s getting more and more tired and likes to stay at home.  So we’ve been celebrating at home more.  This lucky cat birthday cake is the cake of 2013.  Click into the video to see the cake of the previous years and videos of the party!!

Wednesday, March 20, 2013

Parisian Macaron


Nothing says Paris more than Macarons.  This is a basic form of Macaron.  Give it a try!! 

A Ingredients
Almond meal, sifted   300 g
Powdered sugar, sifted    300 g
Egg whites                         110 g
Food color, gel                to taste

B Ingredients
Sugar                        300 g
Water                         75 g
Egg whites               110 g
Food color, gel                to taste

C Ingredients
Chocolate (>64%)                75 g
Heavy whipping cream         75 g
Butter                                    25 g

Preparation
*Age the eggs whites.  Three days to a week before baking, cock the egg whites into a bowl, cover with plastic wrap and store in the refrigerator. 
*Line the baking sheet with parchment paper.  Draw quarter coin circles onto the grainy side of the parchment paper ¼ inch from each other.  Need about four of these parchment papers. 

Directions:
1. Soft the A almond meal and powdered sugar into a mixing bowl. 
2. Add the A egg whites into the mixture.  Fold with a mixer or spatula until no loose powder at the bottom.  Add the food coloring until color is smooth. 
3. Put the B sugar and water into a small pot, heat without stirring until 238-242°F (115-116°C), remove from heat and immediately go into the next step.
4. Beat the egg whites until soft peak form.  With mixer on high speed, add the sugar into the egg whites in a thin stream.  After adding all the sugar, keep the mixer on high for 10 minutes until the temperature of the meringue is touch warm. 
5. Using a rubber spatula, fold the meringue into the A batter.  Try to maintain the volume of the mixtures. 
6. Put a piping tip (Wilton #10 or #12) into a plastic piping bag.  Scoop the batter into the piping bag, pipe a circle onto prepared parchment paper. 
7. Tap the baking sheet on the table to eliminate air pockets, then let rest at an airy area around 20-30 minutes until a skin has formed on the surface. 
8. Double boil the C chocolate until melted, stir in the heavy whipping cream until blended.  Remove from heat and let cool a bit before mixing in the butter.  Pour the cooled ganache into a piping bag with a Wilton #10 or #12 piping tip, store in frig until ready to use.
9. Preheat oven to 325°F/160°C. Double pan the baking sheet to reduce the heat from the bottom.  Bake in the oven for 6 minutes.  Use a fork to jam the oven door open a bit, bake an additional 7 minutes to prevent breaking.  (if oven temperature is even, then just bake 12 minutes straight)
10. Let the macaroon shells cool completely.  Pipe the prepared ganache onto the shells then top it with another shell.  Store in air-tight containers. 

Serving: 3 dozen

Sunday, February 17, 2013

School Day Sandwich


 There are many things I miss about Taiwan, especially its wonderful breakfast culture.  It is the most important meal of the day afterall!! 

Ingredients
Bread slices                    4 slices
Fried eggs                       2 pieces
Cucumber, shredded          to taste
Onion, thinly sliced           to taste
Mayonnaise                     1 tablespoon
Ketchup                           1 tablespoon
Ground black pepper          to taste


Directions
1. Toast the bread slices in a bread toaster.
2. Spread the toasts with some mayonnaise and ketchup, place the shredded cucumber and onion slices, top with the fried egg, sprinkle with ground black pepper, serve hot with some breakfast tea with cream and honey!!

Serving: 2